Everyone who gets into electronics remembers their first few weeks: the blown components, the mysterious smoke, the circuits that were “definitely wired correctly” but didn’t work. I’ve been there. We’ve all been there.
The truth is that a lot of that early frustration isn’t about intelligence or skill — it’s about not having the right tools. The right tool doesn’t just make a job easier; it makes the job possible.
Looking back, there are specific tools (both physical and digital) that would have massively accelerated my learning. Some I just discovered, and some I stumbled onto by accident. And a few I still use every single day.
Part 1: The Physical Tools
Before we talk software or theory, let’s talk about what sits on your workbench. These are the tools that bridge the gap between a schematic and a working circuit.
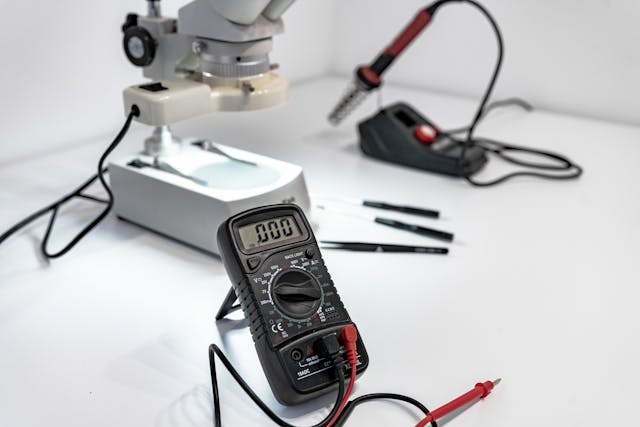
1. A Decent Multimeter
If you only buy one tool, buy a multimeter. It’s the stethoscope of the electronics world. It tells you what’s actually happening in a circuit versus what you think is happening.
What to look for in a beginner multimeter:
- Measures voltage (AC & DC), current, resistance, and continuity
- Capacitance and frequency measurement — huge for understanding filters and oscillators
- Auto-ranging — saves you from manually selecting the range and burning out the meter
- A diode test mode — essential for checking semiconductors and continuity quickly
- Safety rating of CAT II or CAT III if you’ll ever touch mains voltage
Recommended models: The Fluke 117 is the gold standard for professionals, but the UNI-T UT61E+ or an AstroAI Digital Multimeter are excellent budget-friendly options that won’t mislead you.
2. A Breadboard
A breadboard lets you build circuits without soldering, which means you can experiment, rewire, and tear apart a circuit in seconds. This freedom is everything when you’re learning.
Not all breadboards are created equal. Cheap breadboards have loose contact holes that cause intermittent connections. Buy a quality one from MB-102 or a similar reputable brand. The ~$8 investment pays off immediately.
ⓘ Pro Tip!
Get a few, one large 830-tie breadboard for main projects, and a couple of smaller 400-tie boards for sub-circuits you want to test in isolation.
3. A Regulated DC Power Supply
Batteries are fine for small projects, but as soon as you start building anything slightly complex, you need a stable, adjustable power source. A bench power supply lets you set exact voltages and current limits, which means when something goes wrong, you can protect your components instead of burning them up.
The current limiting feature alone is worth the price of admission. Set it to 100mA while testing a new circuit, and you’ll save countless LEDs, ICs, and transistors from accidental destruction.
Look for: A variable 0–30V, 0–5A supply with both voltage and current knobs. The Korad KA3005P or any 30V/5A lab supply with USB connectivity for ~$40–60 is a solid starting point.
4. Wire Strippers and Jumper Wires
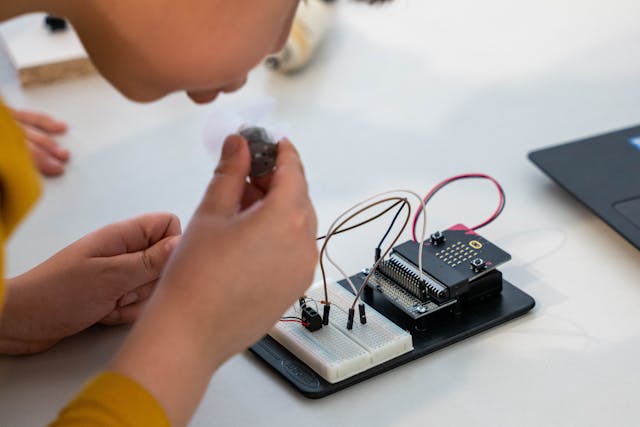
This sounds trivially obvious. It’s not. I spent months using scissors and a thumbnail to strip wires, creating unreliable bare-wire connections that added phantom resistances to my circuits. A proper wire stripper costs $8 and changes everything.
For breadboard work, a full set of pre-made jumper wires (male-to-male, male-to-female, female-to-female) in different lengths removes so much friction from prototyping. Don’t underestimate the value of not having to cut and strip a wire every time you want to connect two points.
5. A Soldering Iron (The Right One)
The $10 pencil irons from hardware stores are a trap. They’re either too cold, don’t regulate temperature, or have terrible tips that oxidize in an hour. I ruined more PCBs with bad irons than from any mistake in my actual circuit design.
The Weller 70 Watt Digital Soldering Station is a classic recommendation, and for good reason, it’s stable, has great tips, and lasts decades. If it’s out of your budget, the Pinecil (by Pine64) is a USB-C-powered smart iron that punches well above its weight for under $30.
ⓘNote
Whatever iron you get, pair it with: good rosin-core solder (60/40 or 63/37), brass tip cleaner, and flux paste. These aren’t optional accessories — they’re what make soldering work.
Part 2: The Software Tools
Here’s where I think most beginners lose the most time: they try to understand electronics purely through theory, without ever simulating a circuit. Simulation tools let you “run” circuits before building them. And more importantly, they let you break things safely and learn why.
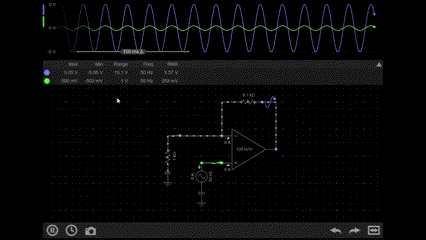
6. A Circuit Simulator
If there’s one category of tool I wish I had discovered in week one, it’s circuit simulation. The ability to draw a circuit, hit “play”, and watch voltage and current values animate in real time is genuinely transformational for understanding how electronics work.
Falstad’s Circuit Simulator (falstad.com/circuit) is free, browser-based, and perfect for beginners. You can simulate filters, amplifiers, oscillators, and more with no installation required. The animated electron flow is worth its weight in gold for building intuition.
LTSpice (free from Analog Devices) is what professionals use. It has a steeper learning curve but handles more complex simulations accurately, including real component models from manufacturers. Once you’ve outgrown Falstad, this is where you go next.
EveryCircuit (everycircuit.com) deserves a special mention for anyone who learns better on a phone or tablet. It runs in your browser and as a mobile app, and its real-time animations of voltage, current, and charge flowing through a circuit are genuinely some of the most intuitive visuals in any simulator.
7. A Schematic & PCB Design Tool
Even if you’re not designing PCBs yet, learning to draw proper schematics is a fundamental skill. It forces you to think in a structured way about your circuit, and it’s the universal language of electronics.
KiCad is free, open-source, powerful, and increasingly the industry standard. Its schematic editor alone is worth using from early in your learning journey — even just to draw the circuits you’re studying, to reinforce your understanding.
At the same time, tools like Autodesk Fusion 360 Electronics offer a more integrated experience, especially if you’re interested in combining electronics with mechanical design. I used Fusion 360 at school, and it’s not really that difficult to learn. You can design your circuit and enclosure in one environment, which is incredibly useful for real-world product development and prototyping.
However, this integration comes at a cost. Fusion 360 typically runs on a subscription model at around $545–$680 USD per year for a full license. There is a free version for students, hobbyists, and startups, but it comes with limitations on features and usage.
8. A Component Reference App
How many times did you stare at a component, unable to remember its pinout, current rating, or voltage specs? I bet too many. The solution is embarrassingly simple: bookmark the datasheets.
But even better than bookmarking datasheets is using an app like Octopart, or even just getting comfortable navigating manufacturer sites like Texas Instruments, Microchip, and STMicroelectronics directly.
The habit of reading datasheets is one of the most valuable skills in electronics. The sooner you get comfortable with them, the faster you’ll learn. Every component tells you exactly how to use it. You just have to read.
Part 3: The Learning Resources
Tools are only useful if you know what to do with them. These are the learning resources I wish I had treated more seriously from the start.
9. The Art of Electronics — Paul Horowitz & Winfield Hill
This is the book. If electronics has a bible, this is it. “The Art of Electronics” is not a textbook in the dry, academic sense. It’s written the way a brilliant mentor would explain things, with intuition first and math as a supporting tool.
It covers everything from basic passive components through op-amps, power supplies, microcontrollers, and RF design.
10. An Oscilloscope (Eventually)
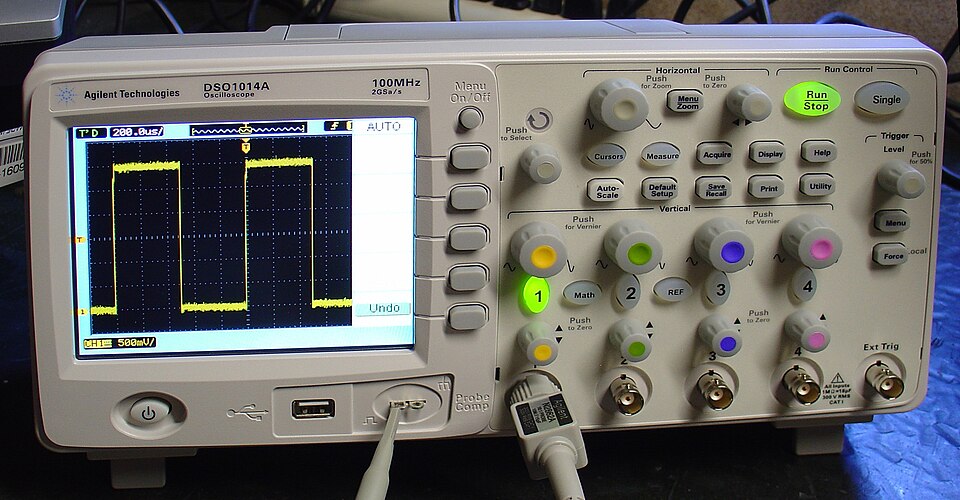
This one goes last because it’s less urgent for absolute beginners. But once you start working with signals, timing, or anything that changes over time, a multimeter isn’t enough. You need to see the waveform.
Entry-level oscilloscopes have come way down in price. The Rigol DS1054Z became legendary in the hobbyist community for being professional-quality at an approachable price. More recently, Fnirsi and Hantek offer decent budget options.
Even a cheap 2-channel scope transforms your ability to debug and understand circuits. The moment you see a square wave flatten into a rounded blob through a capacitor, or watch a clock signal shift phase, the theory becomes completely real.
The Real Takeaway
You don’t need all of these at once. The learning journey in electronics is long and genuinely rewarding, and the tools come gradually.
But if I had to give one piece of advice to myself at the beginning, it would be this: buy a good multimeter, install a simulation tool, and start building circuits.
Remember that learning electronics comes with trial and error. Some things won’t work the first time, but when they do, it’s satisfying. Good tools help you get there faster.
Creator and Editor at AnitoCircuits.com based in Toronto